Vehicles management
All vehicle management can be done in the Vehicles tab (figure 0.1).
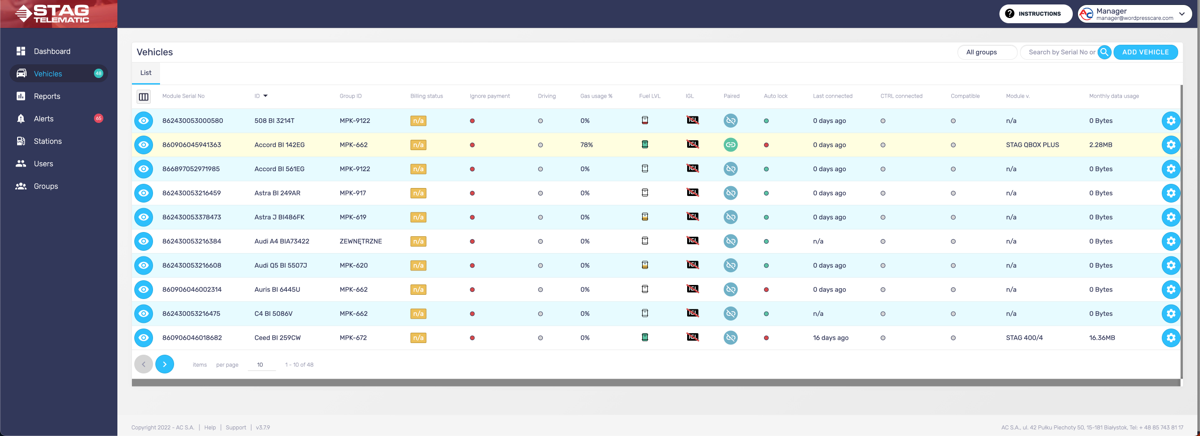
Following is an explanation of all the existing columns:
Module Serial No
The serial number of the module. This a unique number, that is always 14 characters long.
ID
This is an internal number that serves to identify the vehicle. It can be anything. Recommended is to use vehicle make, model and plate number. Never use the name of a person. In many countries, it is considered against the law to connect a person's name with geolocation data.
Group ID
For easier management, you can create groups and assign a vehicle to a group.
Billing status
This is only applicable if you are using an app to pay for the service otherwise orange n/a label will be present. Other states are paid or unpaid labels.
Ignore payment
Some vehicles might be exempt from the payment.
Driving
This means if the ignition of the vehicle is on or off provided all the data were transferred. There are cases where the vehicle shows that the ignition is still on, but the vehicle might lose connection already (by parking in the underground garage for example).
Gas usage %
This number represents the % of alternative fuel (LPG/CNG) used compared to the default fuel (PET/DIE). Generally, you want this number to be as high as possible. The higher it is, the better your savings on fuel are.
Fuel LVL
This represents the fuel level of the alternative fuel (LPG/CNG).
IGL (Intelligent Gas Level)
IGL is a feature that detects fuel levels by counting the amount injected into the engine. To set up IGL follow this guide: Setting up the IGL
Number of refuels
A number representing the overall number of refuels since the vehicle was registered in the app.
Locked
This status is relevant only if you are using the app locking feature. This shows the status of the vehicle and its ability to use alternative fuel (LPG/CNG). It can have a status unpaired, locked, or unlocked, each represented by its icon. The unpaired icon is representing the fact that the vehicle was never paired (you need to first pair the vehicle to be able to use this feature). Locked means inability to use alternative fuel and usually happens after refuelling beyond an authorised station. Unlocked is a status where the vehicle can use alternative fuel.
Locked times
This is the number of how many times the vehicle was locked (refuelling beyond the authorised station).
Visited competition
This is a number of how many times have we registered vehicles present on unauthorized stations. This requires you to add all the stations of your competitor.
Paired
This status is relevant only if you are using the app locking feature. This shows the status of the pairing of the GSM module with the GAS Controller. There are three statuses. Never paired, paired and unpaired, each represented by its icon.
Autolock
Keeping this feature on will mean your vehicle will get locked automatically upon unauthorized refuelling. This is done by the app upon detecting refuel beyond any authorized station. If you turn this off, the application will only record the unauthorized refuel but won't lock the vehicle and prevent it from using alternative fuel (LPG/CNG).
Last connected
This information represents the date and time of the last data received from the GSM module. If the vehicle communicates with the application correctly the value here is "0 days ago".
Data transfer
This means that data are being transferred normally and there is no buffer. If there is any buffer it will be represented by the number of data that were not transferred to the application yet and are kept in the buffer. This happens if the vehicle is driving but is out of reach of any cell tower for some time.
CTRL connected (GAS Controller connected)
This means that the GAS controller is correctly connected to the GSM module. GSM does not need to be connected to the GAS controller if you are satisfied only with the geolocation data.
Compatible
This means that your GSM module is compatible with your GAS controller. There are some cases when the GSM module might not be compatible with the GAS controller. In that case, some of the features might not operate correctly.
Module version
If your module is correctly connected with the GAS controller and data are being sent you will be able to see the module version here.
Monthly data usage
This number represents how much data were sent through the module. Keep in mind that your data provider will add some additional headers when sending the data between cell towers so the final number might be different than the number provided by the module.
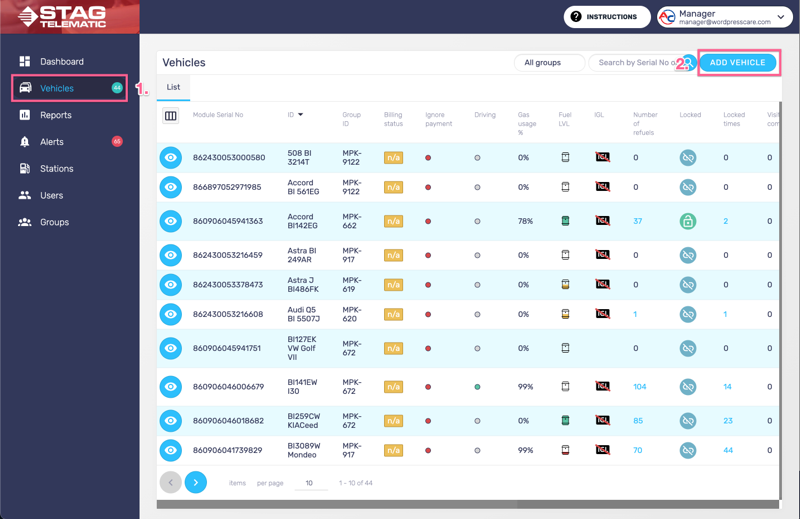
1. Adding new vehicle
After selecting the Vehicles tab from the sidebar navigation, click the button in the top right corner "Add vehicle" (figure 1.1).
You will be presented with the "Add vehicle" screen. Fill in the details and submit the form by pressing the button "Add Vehicle" (figure 1.2).
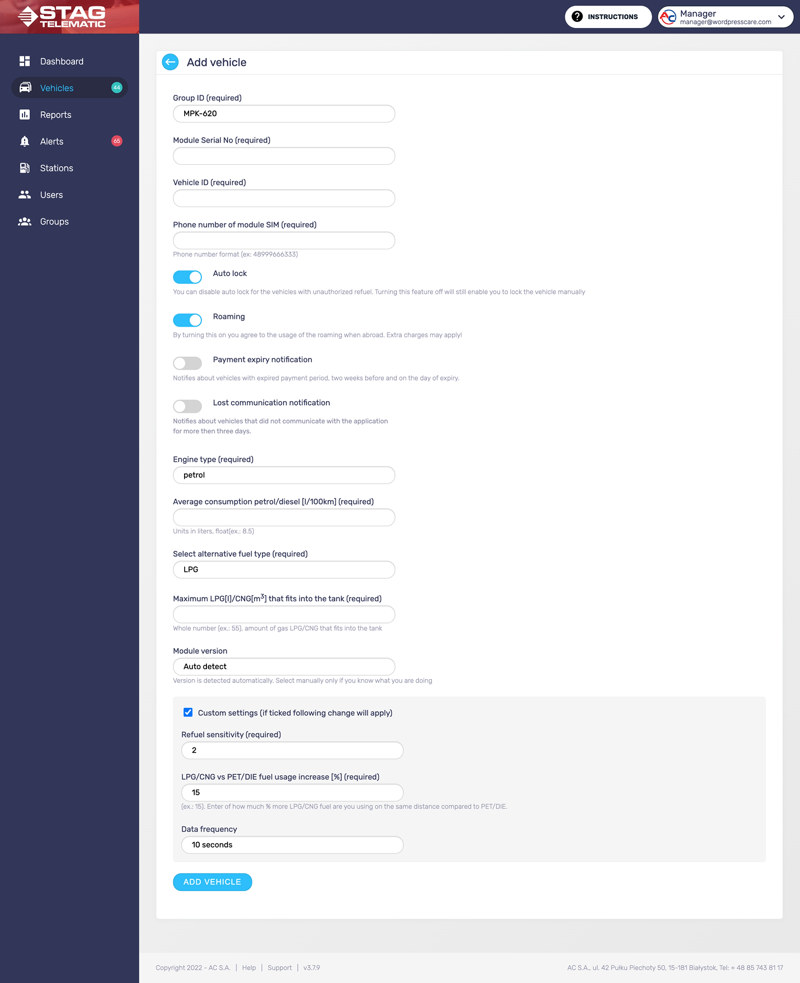
Following are explanations for each field in the form:
Group ID
Each vehicle has to be a part of one group. Initially, there is a default "main" group to which all the vehicles will be added automatically. Once you create multiple groups you will be able to choose one. One vehicle can only be part of one group.
Module Serial Number
This is a number that can be found on the sticker attached to the GSM module. It is a number that is 14 characters long.
Vehicle ID
This field serves as a way to identify the vehicle. The most common is vehicle make and model suffixed with the plate number. Never use real names here to identify a person. It is against the law of many countries to associate a person's name with geolocation data.
Phone number of module SIM
It is important to keep a record of the SIM number. This will serve as a way to communicate with the module directly should there be any issues.
Auto lock
This is only applicable if you are planning to use the module's locking feature. The auto-lock will automatically lock a vehicle if the vehicle won't be refuelled at the authorized station.
Roaming
You might want to keep this turned on as some carriers will share the mobile network antennas and for this roaming might be required. If you are setting this in European countries this will only apply if you travel abroad (to a different country). You might want to switch off roaming to avoid extra charges.
Payment expiry notification
If enabled you will be notified two weeks before your subscription expires. This applies only if you have paid for your vehicles through the application.
Lost communication notification
If enabled you will receive notification about vehicles that did not send any data to the application for more than three days.
Engine type
Here you need to select which engine type is your vehicle using. This information is used later in the statistics calculation.
Average consumption of petrol/diesel
Enter your average consumption. This is consumption based on your experience rather than consumption provided by the vehicle manufacturer. This information is used later in the statistics calculation.
Select an alternative fuel type
Choose if you are using LPG or CNG as an alternative fuel type. This information is used later in the statistics calculation.
Maximum LPG/CNG that fits into the tank
Enter how much gas fits into the tank. This information is being used when calibrating IGL.
Refuel sensitivity
This information is relevant only if you plan to use the lock/unlock feature. The highest sensitivity means that even a small amount of refuel will trigger a locking event. Lower sensitivity might be needed in some sensors that do not have a precise way to measure the level of the alternative fuel in the tank.
LPG/CNG vs PET/DIE fuel usage increase [%]
This is a % representing the number of how much more alternative fuel(LPG/CNG) is being used by the vehicle on the same distance compared to the default fuel (PET/DIE). Generally, you want this number to be between 10% - 20%. This information is used later in the statistics calculation.
Data frequency
This is the maximum time between two data packages being sent from the vehicle by the GSM module. It is not recommended to increase the time, however, might be applicable in some cases where there is a limited data plan or the cost of data is too high.
2. Edit the vehicle

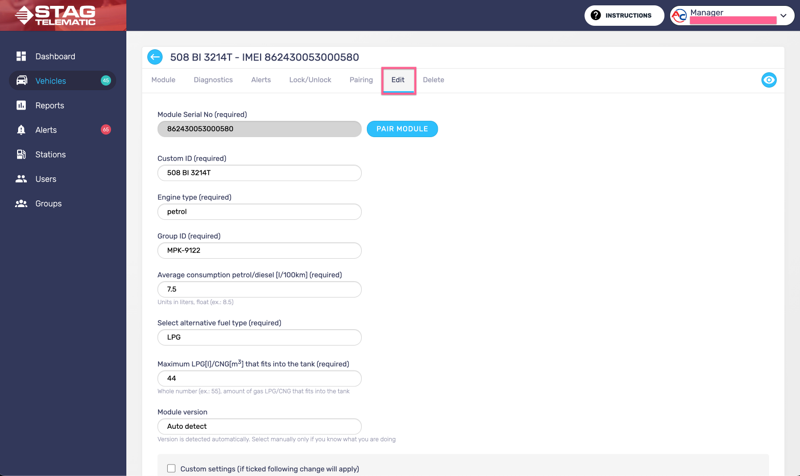
Editing the vehicle can be done from the main Vehicles screen by pressing the "edit icon" (figure 2.1) and selecting the Edit tab (figure 2.2)
3. Removing a vehicle
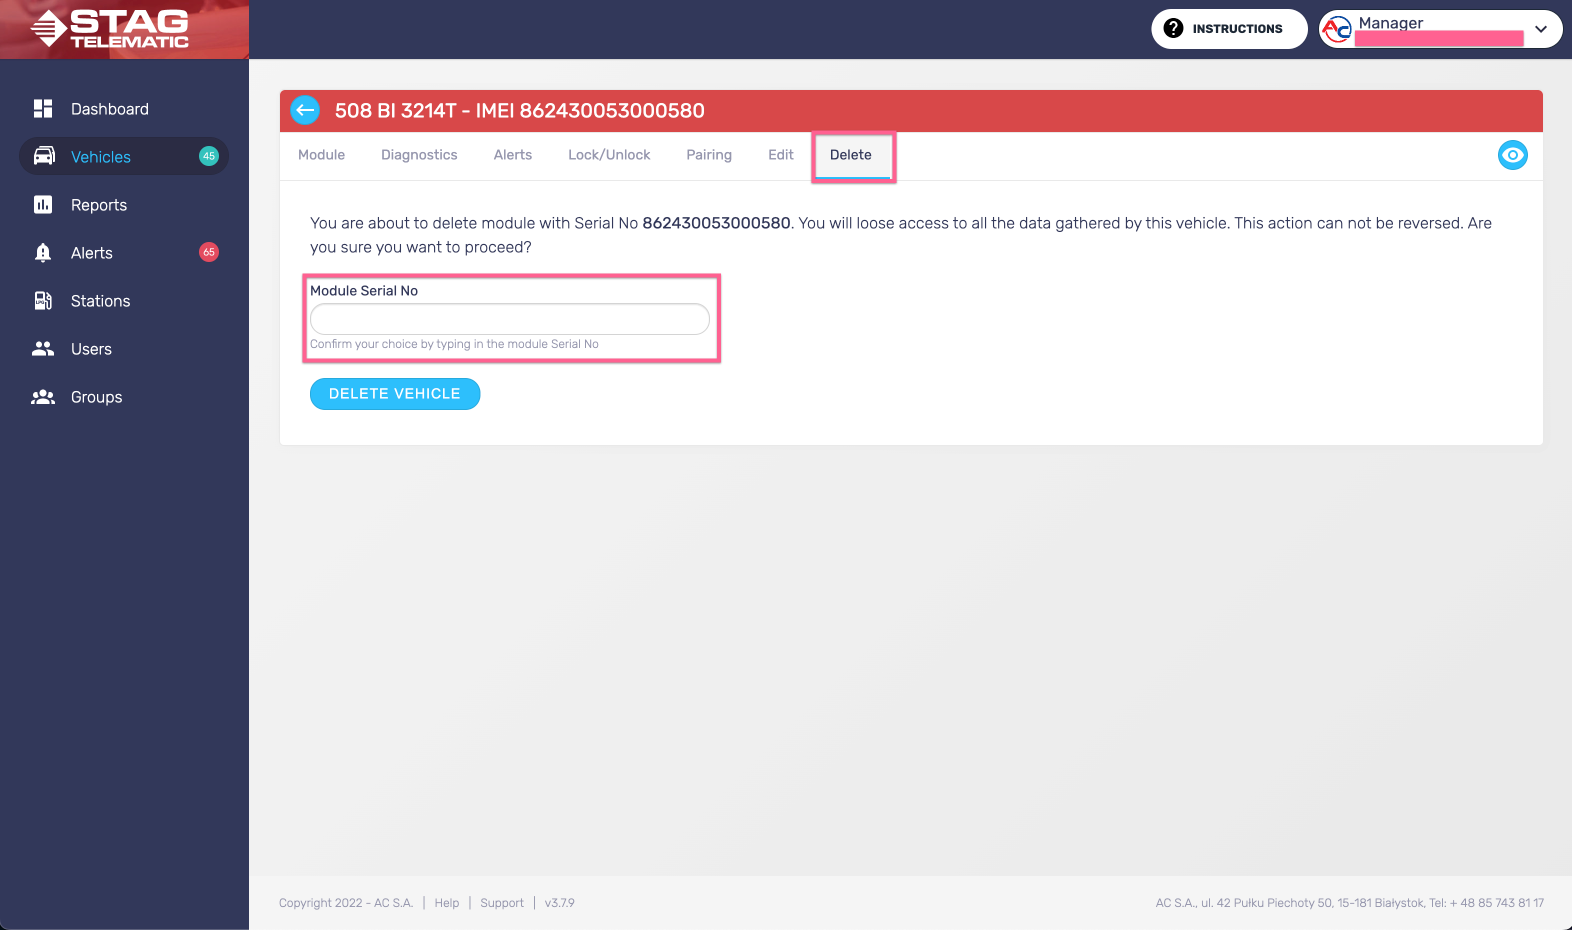
Removing the vehicle can be done from the main Vehicles screen by pressing the "delete icon" (figure 3.1) and selecting the Delete tab (figure 3.2). Once the vehicle is removed all related data are removed apart from the telemetry data which can not be removed and is required by law to be stored for a period of three months.